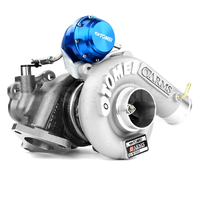


Vehicles equipped with a turbocharger often rely on a blow-off valve, or BOV to help maintain safe pressure levels between the intercooler and the intake manifold on the engine. If you aren't very familiar with turbochargers and performance cars, you're likely wondering "What is a Turbosmart BOV?"
A BOV helps prevent issues with compressor surge, protecting the turbocharger and helping keep the system in better shape overall. Turbosmart is a well-known BOV manufacturer that designs products from high-quality billet aluminum for long-term performance. Turbosmart BOV kits offer industry-leading performance and superior long-term reliability. A BOV only works well when it's properly configured though. That's why it's essential to understand how to adjust your Turbosmart BOV.
How to Adjust Turbosmart BOV?
Your BOV will only protect your turbo when properly adjusted. The steps below take you through the adjustment process to take a newly installed BOV and make it a functional tool for your turbocharger and your engine.
1 - Get the BOV Into Starting Position
To begin adjusting your Turbosmart blow-off valve, locate the adjustment cap on top of the BOV. Look closely at the writing and you'll see it says Harder and Softer. Both of the settings have arrows that indicate which way to rotate the adjustment cap to either increase or decrease the amount of pressure that's required to activate the BOV.
To start the Turbosmart BOV adjustment process you want the adjustment cap turned as far towards the Softer setting as it can be without making it too loose. While turning the cap towards the Softer setting, or counter-clockwise, watch on the side of the housing just below the cap for an O-ring.
If you can see the O-ring your BOV is too loose and you must stop immediately. Do not loosen the cap past the O-ring because if you go too far you'll remove the top and release the tension spring within!
To achieve the proper starting position to begin adjusting your BOV's tension, loosen the cap until you just barely see the O-ring mentioned, then tighten it down until the O-ring just disappears. This is your starting position.
2 - Test Your Free Idle
The first step in the blow-off valve adjustment process is to verify your engine can idle without triggering the valve. With the valve installed and in the softest position, turn your vehicle on and allow it to idle. If the valve isn't open from your idling engine, you're finished with step one.
If it is open from the idle alone, you must carefully tighten the adjustment cap using a clockwise rotation until it remains closed during free idle.
3 - Maintaining the Proper Idle Speed
With your blow-off valve installed properly, your engine should maintain its proper idle speed before and after accelerating. If your idle is dipping too low you need to increase the spring tension in your BOV.
To adjust the tension in your valve, set your vehicle in park and press down on the accelerator to rev the engine lightly. If after the rev the engine settles back into its normal idle speed, your BOV is properly set.
If the idle speed decreases after a rev or the engine stalls, you must increase pressure. Turn the adjustment knob a single turn clockwise and rev the engine again. Continue revving the engine, listening for a slower idle, and tightening your BOV adjustment knob until the engine idles the same before and after a rev.
4 - Take a Test Drive
After tuning your BOV to handle minor revving you're ready for a test drive. This is usually the last step of the adjustment process for a Turbosmart BOV. Take your vehicle out for a drive, and listen for any backfiring and stalling, especially when slowing down or changing gears.
If you notice either of these two problems while driving verify all your connections are tight and increase your spring tension one turn. Continue the cycle between test-driving your car and adding tension until you don't experience any odd performance issues as you drive.
Once you reach that point your Turbosmart blow-off valve is properly adjusted and you can enjoy the protection it offers you, as well as the sound of pressure being released to the atmosphere as you accelerate and decelerate.
5 - Resolving Common BOV Adjustment Issues
Once your BOV is installed and adjusted you may still encounter issues while driving your vehicle. Watch for common issues such as an open BOV during idle, or dips in engine perfomrance and stalling, and use the tips below to resolve them.
The BOV Is Not Closed at Idle
If your blow-off valve isn't closed during idle you have it set too loosely. Increase the tension on the adjuster knob by turning it clockwise in the Harder direction. You must continue turning the knob clockwise until the BOV is closed during idle.
Your Engine is Stalling or Dropping Below Normal During Operation
The most common issue that you'll experience after installing a BOV is a drop in idle speed and stalling. If you notice either of these issues you likely need to increase the tension in your blow-off valve. Before making any tension adjustments though, look closely at the vacuum hose running to your BOV to ensure it's in good shape. If the hose is split or cracked anywhere it will impede proper performance.
As long as the vacuum hose is functioning properly begin turning your BOV adjustment knob clockwise one turn at a time to try and adjust performance to remove problems with slow idles and stalling. If you make enough minute adjustments you'll eventually achieve reliable performance from your BOV.
Maintaining Your BOV Over Time
A properly installed and configured BOV protects your turbocharger from damage during high-performance driving situations. Your blow-off valve must be properly maintained to keep it functioning well over time. Fortunately, proper maintenance isn't as difficult as it seems.
To begin with, remove any vacuum hoses from your BOV and take it out of your vehicle. Now you're ready to inspect, clean, and lubricate the blow-off valve to get it in optimal condition again.
Disassemble Your BOV
Carefully loosen the adjustment cap on the BOV until the top comes off completely and release the spring. Do this with care to avoid getting smacked by the spring when it's finally released. Once you open the top of the valve you have access to all the components that require cleaning and lubrication.
Inspect the BOV
With the BOV removed look closely at the spring for signs of corrosion, and look closely at the piston and bore for any scrapes or pitting. Note any wear to the BOV components because once they start wearing you should consider replacing them soon after.
Thoroughly Clean the Valve
Use a thin soap and water solution along with a microfiber cloth to clean up all the components of your BOV thoroughly. Consider using distilled water to avoid leaving behind any minerals on your BOV components. Let each part sit and air dry fully before starting the reassembly.
Lubricate and Reinstall
Apply a thin coating of hydraulic oil or sewing machine oil to the piston of the BOV before reinserting it and assembling your valve. Reinstall the spring and piston before adding the cap back on and tightening it down.
Once the components are installed and the BOV is reassembled you must install it in your vehicle and calibrate it once again. Follow the same steps outlined above to get your BOV installed and calibrated for optimal performance. By carefully cleaning and lubricating your BOV a few times a year you'll keep it running in optimal condition and help keep the part from wearing and failing.
Conclusion
When fully adjusted your Turbosmart BOV will help protect your turbocharger while making your vehicle sound more aggressive and impressive as you drive. A blow-off valve is simple to install but takes time to configure properly. Use this guide to get your BOV functioning well and you can rely on it to bolster vehicle performance.


